Order Today
Ships Tomorrow
Order by 5PM EST
Custom Brushed Aluminum Signs


Template Categories
Popular Templates


About Our Brushed Aluminum Signs
Description
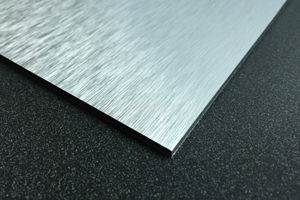
Make a great first impression to your customers by using our custom brushed aluminum signs in your store or office. These signs are great for lobby and receptionist areas, waiting rooms, internal offices, hallways, bathrooms and more. Our brushed aluminum signs are made from 3mm e-panel aluminum that features a reinforced plastic core between two sheets of aluminum. The side we print on has a beautiful brushed finish. These signs offer the ultimate in durability and aesthetics. Printed directly onto the brushed aluminum these signs can be mounted to any rigid surface with standoffs and will last for years with proper care and placement.
Installation & Care
Installation: The most common method of mounting our brushed aluminum signs is to a rigid surface using standoffs. After measuring and marking the location where the sign will be hung you can use the standoffs package (must be ordered as an option) to mount your sign. Note, for some rigid surfaces a pilot hole may be needed before continuing installation of your sign. Simply put your anchor inside of the standoff tube and then drill the screw and tube into the wall through the drilled holes on the sign itself. The final step is to screw on the caps of the standoffs by hand. To install your sign this way you’ll need a measuring tape, a level, and drill. We also recommend selecting the “Drilled Holes” option unless you plan to drill your own holes in the sign. Other methods of installation include double sided tape, or washers and screws.
Care:
The best way to take care of your sign is to post it in a place that will avoid scratches that are either intentional or accidental. Beyond this regular cleaning of the sign using a damp non-abrasive cloth will ensure that it remains vibrant for years to come. If storage is necessary store the signs at room temperature in a dry location. Signs should also be covered with a non-abrasive material to avoid being scratched while stored.
Brushed Aluminum Sign Highlights
Weight: .54lbs per square foot (about the weight of 5.5 Snickers Bars)
Thickness: .12" (about the thickness of 30 sheets of copy paper)
Details: 3mm brushed aluminum e-panel, reinforced Polyethylene core for maximum durability, printed directly to surface, white ink is not printed but brushed in appearance.
Uses: Interior and Exterior Use. Lobby and reception areas, building directories, restroom signage, interior walls and hallways including room number signs, arenas, interior directional signage.
Print Method: Four color process, eco-friendly, weather, fade and abrasion resistant UV ink
Estimated Lifespan: 5+ years with proper placement and care
Common Sizes: 8”x8”, 10”x10”, 12”x12”, 24”x18”, 4’x2’
Brushed Aluminum Sign Options
-
Cut

-
Drilled Holes
-
Standoffs
-
White Ink


Image Gallery
- src=https://www.esp.com/content/assets/filelibrary/brushed-l8r-354.jpg::alt=Brushed Aluminum L8R Sign
- src=https://www.esp.com/content/assets/filelibrary/Brushed-Aluminum-Conference-Room-254.jpg::alt=Brushed Aluminum Conference Room
- src=https://www.esp.com/content/assets/filelibrary/20150925-153620-480.jpg::alt=Brushed Metal Contour Cut Sign
- src=https://www.esp.com/content/assets/filelibrary/Brushed-Aluminum-Directory-Sign-255.jpg::alt=Brushed Metal Directory Sign
- src=https://www.esp.com/content/assets/filelibrary/Brushed-Aluminum-Interior-Signage-256.jpg::alt=Brushed Aluminum Interior Signage
- src=https://www.esp.com/content/assets/filelibrary/Brushed-Aluminum-Restroom-Sign-257.jpg::alt=Brushed Aluminum Restrooom
- src=https://www.esp.com/content/assets/filelibrary/Brushed-Room-Detailed-Sign-258.jpg::alt=Brushed Room Detailed Sign
- src=https://www.esp.com/content/assets/filelibrary/venice-266.jpg::alt=Brushed Venice Italy
- src=https://www.esp.com/content/assets/filelibrary/escalante-265.jpg::alt=Brushed Aluminum Escalante
- src=https://www.esp.com/content/assets/filelibrary/Brushed-Aluminum-Close-Up-253.jpg::alt=Brushed Aluminum Cinque Terre Italy
- src=https://www.esp.com/content/assets/filelibrary/brushed-aluminum-contour-cut-270.jpg::alt=Brushed Aluminum Contour Cut Company Logo
- src=https://www.esp.com/content/assets/filelibrary/20150731-130044-328.jpg::alt=NCAA Champion Brushed Metal
- src=https://www.esp.com/content/assets/filelibrary/20150925-151839-463.jpg::alt=Brushed Closeup NFL Sign
- src=https://www.esp.com/content/assets/filelibrary/20150925-152005-464.jpg::alt=Close Up Brushed Metal Sign
- src=https://www.esp.com/content/assets/filelibrary/20151005-134405-502.jpg::alt=Set Thermostat Brushed Metal Sign
- src=https://www.esp.com/content/assets/filelibrary/Cut-to-Shape-Brushed-Aluminum-614.jpg::alt=Village Vaporium Contour Cut Interior Sign
Frequently Asked Questions
Product Specs
- What is e-panel?
- E-panel is a type of aluminum sign that that is made up of two thin aluminum sheets with a reinforced plastic core in between. The plastic core is Polyethylene, which is a durable plastic that adds to the longevity of the sign. The top sheet of aluminum is manufactured with a clean brushed finish.
- How does brushed aluminum differ from standard aluminum?
- Our brushed aluminum and standard aluminum signs both use e-panel. The differences between the two are the appearance of the brushed aluminum and the fact that the brushed aluminum is 3mm thick while the standard aluminum signs are 2mm thick. The only other difference of note is the appearance of the color white on the printed sign. No white ink will be printed on the brushed aluminum.
- How will the color white appear if it is part of my design?
- While the color white on a standard aluminum sign will print exactly as it is seen, this is not the case on brushed aluminum. Any white portion of your sign design will have a very muted appearance of white on a brushed sign. It is safer to say that the color white will appear like the brushed appearance of the sign as if nothing were printed on it. There are example pictures of this color white within the photo gallery on this page. Your design, even with the color white, will look fantastic this way. We simply want you to know in advance exactly what to expect for logos or designs that include lots of white.
- How thick are the brushed aluminum signs? Do you offer additional thickness options?
- Our brushed aluminum signs are 3mm, or an ⅛”, thick. We also offer 4mm (.16”) thick brushed aluminum. 3mm is the equivalent of approximately 11 gauge steel. If you want to order 4mm brushed aluminum please contact us for this custom order and pricing.
- Are the brushed aluminum signs reflective in nature? Do you offer reflective signs?
- Neither our regular aluminum signs nor our brushed signs are reflective in nature. We anticipate adding reflective aluminum signs to our website in the near future.
- Why is shipping so much if you offer free shipping?
- We offer free shipping on all orders over $75 with the exception of rigid signs over 36” in either dimension. Unfortunately shipping rigid signs larger than 36” requires us to use freight shipping. This is extremely costly to do so we simply can’t offer this type of shipping for free currently.
- Can I drill my own holes?
- Yes! If you feel comfortable with power tools then you can easily drill your own holes in your sign. Having said that we would highly recommend simply selecting the Drilled Holes option to ensure a perfect fit with the standoffs. It is also very reasonably priced and saves you time!
- I need holes in different or additional locations than the 4 corners. Is this possible?
- Our drilled holes are by default placed 1” from each corner and are ⅜” diameter. If you need additional or different hole locations you can specify this in the customer comment field on the checkout page. Within reason we can usually accommodate any request assuming that the “Drilled Holes” option has been selected.
- What sizes do you offer for the brushed aluminum? Any size restrictions?
- In addition to the standard sizes we offer (8”x8”, 10”x10”, 12”x12”, 24”x18”, 4’x2’) we can do almost any custom size brushed aluminum sign you might need. The smallest sign we can do is 4”x4”. The biggest sign we can print is 48”x96”.
- What is the estimated lifespan of the brushed aluminum?
- With proper care and placement your sign should last at a minimum of 3-5 years. This estimated lifespan can vary depending on the type and location of usage. For example, exterior usage with constant exposure to a harsh climate will result in a shorter lifespan than a sign that is placed indoors and in a location that will not be inadvertently scratched or damaged.
- My design is extremely detailed/complicated. Does this mean it will cost me more?
- Regardless of how simple or complicated your design or logo might be it will not cost you more. We offer free design services up to 3 revisions and almost always are able to accommodate design requests at no additional cost. If you’re still unsure please feel free to contact us to discuss your design needs.
- Will using more than 2 colors in my design cost me more money?
- Much like our free design services the number of colors included in your design will not impact cost due to the fact that we print everything in full color. The only time color may impact the price of your sign is when color matching is requested. In this case, there is a $50 one time charge per order and we will need the solid coated Pantone color number in order to match the color(s) for you.
- Should I be concerned about the sharp edges of the signs?
- Without a doubt the sharp edges on these signs can be dangerous if rubbed against. If your sign is going to be placed in a location that prevents this then you have nothing to worry about other than handling the sign with care during installation. Alternatively, we offer a “Rounded Corners” option in which we’ll cut the corners to eliminate the dangerous corners and provide a clean look to your sign. This option can be selected during the checkout process and at less than $5 an affordable option.
- Can you print my brushed aluminum sign on both sides?
- While our standard aluminum signs can be printed on both sides the brushed aluminum signs are only singled sided.
- What is the “reinforced core” described above? How does this impact the sign in terms of functionality and aesthetics?
- The reinforced core is a Polyethylene plastic that in layman’s terms is simply a hard plastic. This hard plastic adds little extra weight to the sign but makes it incredibly durable and less susceptible to damage. Further, because it is in between the aluminum sheets it in no way detracts from the aesthetic appeal of a beautifully printed brushed aluminum sign.
- Does this core make the sign extremely heavy?
- As noted above, the plastic core in no way makes the sign heavy. In fact, compared to a full aluminum sign of comparable thickness, it is much lighter. These signs are truly a lightweight yet durable exterior/interior signage option.
- Do you do engraving for the brushed aluminum?
- At the time we do not offer any custom engraving of the sign.
- Can my sign be cut to a specific shape?
- Yes. For signs that need to be cut to shape you can select to have it cut exactly to the border (“Contour Cut”) or with a tiny border around the cut (“Halo Cut). In both cases there are exceptions in our ability to cut intricate designs and those that are less than 1” thick in any given location of the sign. Also, be aware that a cut to shape metal sign can be very sharp and should be handled with care at all times.
- Do you use a vinyl overlay or print directly onto the aluminum?
- We print directly onto the surface of the brushed aluminum. There is no vinyl overlay that goes down. We’ve found this to produce sharper and clearer signs that are visually stunning. Further, vinyl overlays can be susceptible to peeling away over time whereas the UV ink we print with is both scratch and fade resistant. Thus, your sign will look better and last longer!
- Can I elect to put an enamel or laminate in order to protect the printed portion?
- Typically a vinyl overlay is not needed due to the fade and abrasion resistant ink we use in our printing process. On brushed aluminum, a laminate would not work due to the brushed texture.
- What is the default material look like?
- Unlike our standard aluminum which is white, if you were to order a blank piece, our blank brushed aluminum has the metallic brushed look you will see on the actual sign. We then simply print directly onto the surface according to your logo or design (without the white). The makeup of the sign as described above is two thin outer sheets of aluminum with a reinforced plastic core.
- Are aluminum signs the same as metal signs?
- Yes. Aluminum is a type of durable and rust resistant metal that is a wonderful option for exterior and interior signage. So whether you want to call it a metal sign, e-panel sign, or aluminum sign we’ll understand what you’re referring to. Just make sure you specify between the standard and brushed aluminum products we offer.
- Can the brushed aluminum be individual letters like I see in many offices?
- We do have the capability of cutting out individual letters, but only if the thinnest part of your letter is no thinner than .25 inches. It should also be noted that the typical material used for this type of signage is generally one in which there is only one thin sheet of aluminum and behind it is one to three inches of gator board or foam board. These letters are usually then adhered to a wall using an adhesive. If you are interested in these types of signs please contact us for availabilty and pricing.
Usage
- Will my brushed aluminum rust with exterior use? Interior use?
- Aluminum as a metal is rust resistant. Thus, whether you decide to use the sign inside or outside it should not rust. That said, much like any other sign there will be wear and tear on the sign over time. This will be more evident for signs placed outside in harsher climates. Lastly, nuts, bolts, or even screws that are not rust resistant can cause rust to happen around where they are located. But the sign itself should not rust over time.
- Will my sign bend?
- Regardless of the size of your brushed sign there will be some pliability or bendability to it. The smaller signs will have less while the larger signs will have much more pliability to them. This is true of any larger rigid sign unless you order an extremely thick sign, which in many cases becomes cost prohibitive. Notwithstanding, these aluminum signs are extremely durable and should not break in day to day use. For larger signs, as outlined below, we recommend posting them with extra middle support to prevent damage.
- Are your brushed aluminum signs suitable for outdoor use?
- Yes! They are absolutely suitable for outdoor use as well as indoor use. Outdoors they can literally be used in any climate or situation. Just make sure to install them properly and be prepared to removed them in extreme weather to prevent damage.
- Will my signs fade or scratch?
- The UV ink we use to print will prevent the actual printing from fading or being rubbed off over time but the metal itself can scratch. This will not occur if someone or something rubs up against it in daily use but any sharp object, whether inadvertent or intentional, can and will scratch your sign.
- What are typical uses for brushed aluminum signs?
- Brushed aluminum signs can be used in a variety of ways and are most often used in business settings. Exterior uses include branded signage in front of a store or even building directories. Interior uses include lobby and reception area signs, signs for offices or rooms that include the room number or name of the conference room, bathroom signage, exit signage, directory signs inside of large business offices or even medical facilities, and directional signage in a wide variety of places such as shopping malls and arenas. The combination of durability, affordability and great looking signs make them an interior favorite in these situations.
- Can these signs be used with metal frames or even pre-existing frames I already have?
- Currently we don’t offer any frames but the signs can be used in existing frames assuming that they fit or can use the drilled holes to be installed. You should confirm that this is the case as we can’t guarantee they will work your frame due to the wide variety of frames available for use.
Installation and Care
- How do I install my brushed sign? / Where can I post it?
-
Your sign can be hung or posted in several ways. First, it can be hung using a rope, chain, or otherwise in a number of settings. It can also be posted using bolts and screws to existing wooden poles. As noted above, if you will be posting a large sign we highly recommend a middle support post and anchoring to prevent wind and other damage to the sign.
The most common installation method is to use standoffs and mount the sign to a rigid surface. This method is what is most often seen in professional business settings due to it’s superior look. In order to mount your sign this way you will need to select the options of “Drilled Holes” as well as “Standoffs.” Unless you want to drill your own holes then you will only need the standoffs. This will ensure you have everything you need to mount your sign.
The first step will be to measure and mark the locations of where you will drill and hang your sign. Once you’ve done so and ensured it will be properly spaced and even you need to use the standoffs package to install your sign.
Your standoffs package will consist of four standoff tubes, four anchors, four screws and four standoff caps. Put an anchor into a standoff tube and insert it through the drilled hole of the sign. While having someone help you hold the sign up to your pre-determined location, use a drill to install the screw through the anchor and tube and into the wall. Repeat this for all four corners. Once it is affixed to the rigid surface screw on the standoff caps by hand and you’re done! You now have a gorgeous brushed aluminum sign with standoffs hanging on your wall! Please note that some rigid surfaces will require that you drill a pilot hole before screwing the screw into your surface.
- Do I need to clean my sign? If so, how and how often?
- Cleaning your sign regularly will keep it looking as clear and good looking as the day it arrived. Regular cleaning can be done with a damp non-abrasive cloth. A simple but gentle wiping of the sign will clean the sign without adversely impacting the sign as it is mounted to a wall or other rigid surface. Strong cleaners and abrasive rags should be avoided as they both will damage your sign.
- How do I store my signs?
- Your signs can be stored in a dry location at room temperature. We would recommend placing a non-abrasive material in between signs if more than one will be stored. Without doing so the signs can be scratched by other signs while being stacked, moved or removed from storage. This material will also help prevent scratches or cuts if someone inadvertently rubs against the sign while being stored.
Your trusted, custom signage provider.


