Order Today
Ships Tomorrow
Order by 5PM EST
Custom Perforated Car Decals


Template Categories
Popular Templates


About Our Perforated Car Decals
Description
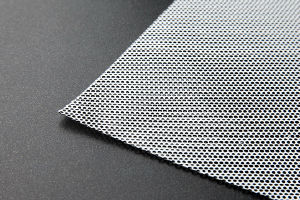
Advertise your business or add a personalized graphic to your vehicle using our custom perforated car decals. With specially-designed micropunctures over 50% of the film, the adhesive vinyl decals appear opaque from the outside without compromising the driver's view. Perforated car decals also have the addition of a clear laminate that prevents dirt buildup in the pores.
Installation & Care
Installation: If you want your decals to cover the entire window, make sure you order them one inch longer and taller than your window to allow for trimming. Premark the desired position with a dry erase marker. Peel the backing off and realign to your marks. Press the decals onto the window, starting from the middle and working your way out. Trim the excess with a sharp razor blade. Installation is much easier with two people.
Care: Perforated decals are safe for most car washes and will stand up to most exterior elements. To extend the life of your decals, avoid parking in direct sunlight for long periods of time. Remove dirt and other buildup regularly to keep adhesive strong.
Perforated Car Decal Highlights
Weight: .09lbs per square foot (about the weight of 9 quarters)
Thickness: .017" (about the thickness of 4 sheets of copy paper)
Details: Perforated, long lasting, privacy, removable
Uses: Indoor/Outdoor. Vehicle windows, business advertising
Print Method: Four color process, eco-friendly, weather, fade and abrasion resistant UV ink
Estimated Lifespan: 3+ years with proper installation and care
Common Sizes: 6"x6", 12"x12", 24"x12", 36"x12", measure to cut
Perforated Car Decal Options
-
Cut


Image Gallery
- src=https://www.esp.com/content/assets/filelibrary/Perforated-Rear-Window-Car-Decal-210.jpg
- src=https://www.esp.com/content/assets/filelibrary/Perforated-Car-Decal-White-Lettering-473.jpg
- src=https://www.esp.com/content/assets/filelibrary/Rear-Window-Decal-Perforated-474.jpg
Video Gallery
- k8Z5II4e87E::Installation
Frequently Asked Questions
Product Specs
- What material is your perforated car decal made out of?
- The perforated decal is a thin vinyl material. This material is covered with micropunctures (50% of the surface area) that allow one way visibility through your sign. The material also has an adhesive backside that sticks to your vehicle’s window.
- Will my perforated decal be transparent or allow visibility?
- Yes. Due to the micropunctures that cover 50% of the sign the decal will provide one way visibility. Thus, a rear window decal that covers the entire window will not impede the vision of the driver while still allowing other vehicles to clearly see the design/marketing message it may contain.
- Do you offer other types of vehicle decals?
- Yes. We also offer clear vehicle decals and opaque vehicle decals. The former is an alternative to the perforated decal as it will be transparent on any portion that does not have something printed on it. Due to the transparency being only where it isn’t printed we recommend that large decals covering an entire window be only perforated car decals. Opaque vehicle decals work great for the side of vehicles in a wide range of uses and business type vehicles. We do not recommend the opaque decals for car windows unless they are small enough that they will obscure the driver’s ability to see.
- Are vinyl car decals the same thing as car window stickers or car window graphics?
- In most cases the terms are used interchangeably. The more important distinction is the visibility provided by each of the different types of decals as described briefly above. Further, it should be understood that all three types of car decals we offer are semi-permanent in nature. So whether you call it a decal, sticker or window graphic once applied they will not be able to be reporposed.
- How thick are your custom perforated car decals?
- Even with a laminate covering on top of the decal they aren’t any thicker than the combined thickness of a few pieces of normal printer paper. Technically speaking they are .017” thick.
- What is the lifespan of your perforated vehicle decals?
- The lifespan of your decal will vary based on the usage of the decal and the environment it is exposed to. Typically they will last 3+ years assuming they are properly installed and cared for. Nonetheless, harsh climates and continual exposure to the elements can decrease this lifespan. We’re confident that if you install it correctly and avoid pressure washers and car washes that it will last for a good amount of time.
- Will the exposure to sun or the elements ruin my perforated decal?
- Our perforated decals are made to be out in the elements and perform well. We’re confident that you’ll find your decal to be a long lasting and effective way of marketing your business. However, as noted above, the continual exposure to harsh elements can decrease the lifespan of the decal.
- Can the perforated vehicle decals be cut to shape? Individual letters?
-
Yes. We offer two different cut options. The first (contour cut) cuts your design to the exact shape of the design. The second (halo cut) leaves a small border around the edge of your entire design.
There are two things to note with cut to shape perforated decals. The first is that in most cases it is not not necessary. This is due to the fact that it offers one way visibility and so it doesn’t matter if it covers the entire window. Unlike other decals that may obstruct visibility and need to be cut this isn’t the case with perforated decals.
The second note is that due to the micropunctures of the perforated decal, cutting will not leave a flush or straight edge. Rather the edge will result in a somewhat ragged edge. While this shouldn’t affect the functionality of your decal we don’t want it to come as a surprise if you decide to choose one of our cut options.
Our recommendation for perforated decals is to simply have them cover the entire window and avoid cutting them to shape.
- What is the minimum and maximum size decal I can order? Are there restrictions on size?
- Our custom perforated decals are essentially limitless in size options. Nonetheless there is a minimum and maximum size your decal can be. The minimum is 6”x6”. The maximum is 53”x11998”. That’s 1000 feet! In other words, as long as you keep one of your dimensions under 53” we can accommodate your custom sized perforated decal.
- What if my decal has more than 2 colors? Will it cost more?
- We print all of our decals (and signs for that matter!) in full color. So unlike other sign shops or printing houses that may charge differently based on the number of colors, we don’t. Regardless of the number of colors or how detailed your design might be it will not make your decal more expensive. We even offer free design services if you need design help.
- What dimensions should I use for a window that isn’t a perfect rectangle or square?
- The safest way to make sure your decal covers the entire window is to make your decal the largest width and the largest height of your window. Please make sure to measure the top and bottom width of the window as well as the left, center and right height of the window. This will allow us to print a sign that covers your entire window. You can then trim the excess of the decal after installing it on your window.
Usage
- Will my perforated decal damage or ruin my window or vehicle in any way?
- No. Assuming there is no damage done during installation or removal (misuse of a sharp edge or razor) then the actual decal itself will not damage the window in any way.
- What are perforated car decals typically used for?
- As noted above the most common use of a perforated decal is on the rear window of a car or vehicle. These are commonly used to advertise businesses. The most common businesses using perforated car decals are catering companies, tradesmen such as plumbers, electricians, contractors, landscapers, etc., home based businesses and companies that have a fleet of vehicles. Likewise public transportation such as buses, taxis, and others often use perforated decals as a way to advertise yet not impede visibility of the drivers.
- Can I place my decal on the inside of my car window and have it be visible to those outside?
- No. Due to the nature of the material itself a reverse print and inside placement is not possible. Perforated car decals must be placed on the outside of the window.
- Can the perforated decal be used only on a glass surface such as a window?
- No. Technically speaking the decal can be placed on any nonporous and smooth surface. Nonetheless, the main reason for buying a perforated decal is due to the one-way visibility it offers. Thus, using it on a solid surface such as a wall will negate the primary advantage of the sign. So in almost all cases the perforated decal is used on a glass surface like a car window.
- Will the micropunctures get clogged up and decrease the transparency over time?
- No. Our perforated car decal comes with a laminae overlay on top for this very reason. This thin laminate layer will not impact the visual aspect of your sign but will prevent dust, grime and dirt from getting into the micropunctures. Thus, the transparency on day one will be the same as it will be after months or years of use.
Installation & Care
- Does my decal have a backing? How do I remove it?
-
Yes, your decal comes with an adhesive side that is protected by a backing when originally shipped. Removing it is much like peeling a sticker away from a sticker sheet. The easiest way to do so is to start in a corner to get it started. Once started gently peel away the backing to expose the adhesive side of the decal.
If the very thin backing is hard to find or remove then a piece of scotch tape can be used to help peel away the backing. Simply put the piece of scotch tape on corner of the backing with part of it sticking off the edge of the sign. Then use the piece of tape like a tab and pull the backing away.
Please be sure to remove the backing slowly and carefully so that you don’t unintentionally leave part of the backing on the sign.
- How do I install my perforated window decal?
-
For the installation of your perforated decal, water should not be used. Before installing your decal make sure to read through all the instructions.
The first step is to clean your window with water and allow it to air dry. Once it is dry you can remove the backing protecting the decal’s adhesive side. Make sure the decal doesn’t stick to itself once the backing is removed!
The next step is the initial application of the decal to the window. This should be done lightly and methodically so that as air bubbles or pockets arise the decal can be peeled away and reapplied as needed. The easiest way to accomplish this is to “tack” two of the corners of the decal into place. To tack the corners just gently press the decal against the window in the corners. This will allow you to then apply the rest of the decal working from one side of the decal to the other. Carefully peel it back and reapply as necessary. Using a flat edge such as a squeegee helps to apply the decal without air pockets arising.
Once the entire decal is in place it can be pressed more firmly onto the window to ensure that the adhesive fully sets in. As noted elsewhere, once the adhesive is fully active removing and repositioning your decal will not be possible.
- Does installation require more than one person?
- Yes. The combination of the fact that perforated car decals are typically larger and installation on a car window can be awkward we recommend all decals be installed by 2 or more people. This makes the installation process significantly easier and will help you end up with a better looking decal!
- How do I store my decal?
- Prior to installation you can store your decal in one of two ways. You can roll it and store it rolled or you can lie it flat. If the former, make sure not to place any heavy objects on top of the decal as it can cause permanent creases. Either way it should be stored in a dry location at room temperature.
- How do I clean my decal? Can I wash my window or vehicle with the decal installed?
-
Your decal should be washed regularly. To do so use a wet or damp cloth that is non-abrasive to gently wipe away any build up on the laminate overlay. This will help retain the transparency of the decal and the vibrancy of the printed design.
While your decal is installed you should not use power or pressure washers at home nor car washes. The power of both of these methods can be significant enough to cause the decal to start to peel away or to rip the decal right off the window.
- How do I remove my decal? Will it leave behind a huge mess and lots of residue?
-
To remove your decal simply pull the decal away from the window. A sharp edge that won’t damage the window itself can be used to help peel it away. Usually no residue will be left, but when the decal is aged or has been exposed to extreme conditions, some residue may be left behind. In these cases most standard cleaners and a scrubbing will remove it.
Difficult to remove decals come off easier when heated up. This can be accomplished by parking in the sun before removing it or even heating up the window with the car’s heat or a blow dryer. Though having to do either of the latter is rare and a last resort option for a decal that may have been in place for years.
Your trusted, custom signage provider.


