Order Today
Ships Tomorrow
Order by 5PM EST
Custom Opaque Window Decals

100% Satisfaction Guaranteed


Template Categories
Popular Templates


About Our Opaque Window Decals
Description
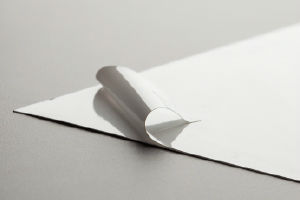
With our semi-permanent opaque window decals, you can add custom graphics that will last indoors and out, yet are easily removed when you're ready for a new look. Decals are printed on durable, white adhesive vinyl that will give a professional look to any retail or office window for advertising or decor purposes. They can even be contour cut for a more personalized design.
Installation & Care
Installation: Thoroughly clean the window surface and allow it to dry. For smaller decals, simply peel off the backing and lightly press the decals onto the window. For larger decals, coat the adhesive side with slightly soapy water (1-3 drops of soap), position them on the window and then use a rubber-tipped squeegee to remove air pockets and excess water. The adhesive will activate once it is dry.
Care: Do not let your decals become exposed to water for an extended period of time before installing. Once installed, clean with a damp cloth. Avoid power washing, which could cause the decals to peel and lose their adhesive quality. To remove the decals, peel away from the window, then use a razor blade and window cleaner to remove any excess adhesive residue.
Opaque Window Decal Highlights
Weight: .09lbs per square foot (about the weight of 9 quarters)
Thickness: .015" (about the thickness of 4 sheets of copy paper)
Details: White, versatile, bubble-free finish
Uses: Indoor/Outdoor. Retail, home or office windows
Print Method: Four color process, eco-friendly, weather, fade and abrasion resistant UV ink
Estimated Lifespan: 5+ years with proper placement and care
Common Sizes: 12"x12", 24"x12", 2'x2', 4'x4', 3'x5'
Opaque Window Decal Options
-
Cut


Image Gallery
- src=https://www.esp.com/content/assets/filelibrary/Opaque-Window-Decal-Hours-216.jpg
- src=https://www.esp.com/content/assets/filelibrary/Opaque-Window-Decal-217.jpg
- src=https://www.esp.com/content/assets/filelibrary/20150616-120207-306.jpg
- src=https://www.esp.com/content/assets/filelibrary/20150721-123624-307.jpg
- src=https://www.esp.com/content/assets/filelibrary/20150925-152254-465.jpg
- src=https://www.esp.com/content/assets/filelibrary/20150928-125320-484.jpg
- src=https://www.esp.com/content/assets/filelibrary/20151005-133019-498.jpg
- src=https://www.esp.com/content/assets/filelibrary/20150616-120415- 554.jpg
Frequently Asked Questions
Product Specs
- What material is your opaque decal made out of?
- Our opaque window decals are made out from a polymeric calandered film with a grey pigmented, pressure sensitive adhesive. They are a durable adhesive vinyl for semi-permanent uses.
- Will any of the decal be clear?
- No. Even if you print nothing on your decal it will be opaque in nature. The default material is white. Thus, there is no way to use an opaque window decal in a location that requires transparency. If transparency is needed, both our clear and perforated window decals will work.
- Do you offer other types of decals?
- Yes, we offer a number of different decals. Clear and perforated decals offer transparency and reverse print as options, we also offer three different types of vehicle decals and wall decals for interior use. Lastly, is our interior floor decal that is great for convention centers, retail shops and more.
- Is a window graphic or sticker the same thing as your opaque window decal?
- The terms are often used interchangeably. For a more detailed breakdown see our window decals page or even a blog post in which we discuss different types of window signs. Just keep in mind that by asking for a “window sticker” that the decal you get will be semi- permanent and will not be able to be repositioned and used in more than one location after the initial installation.
- How thick are your window decals?
- Our opaque window decals are .003 inches thick. Roughly the same thickness as a couple of sheets of normal copy paper.
- What is the lifespan of your opaque window decals?
- With proper care and placement, your decal can last up to five years. The circumstances in which the high end of the lifespan will be achieved will be when the decal is used in an interior setting and is properly installed and maintained. Exterior use that results in constant exposure to the elements and/or poor installation or maintenance can decrease the lifespan of the decal. Notwithstanding, exterior usage should still result in a decal that lasts 1-3 years.
- Will the exposure to sun or the elements ruin my decal?
- As noted above the decal’s lifespan will naturally be shortened when used for exterior use rather than interior use. While this is true we do print with a UV ink that prevents scratching, abrasions and fading. Thus, assuming that the decal is installed properly your printed design should remain vibrant for several years with the decal firmly adhered to your window.
- Can the decals be cut to shape? Individual letters?
-
Regardless of the end use of your decal we can cut it to shape. We can do this in two different ways. The first is to cut it to the exact perimeter of your design. This is called contour cut. The second way is to cut it to shape but leave a small border around the entire edge of your sign. This is called halo cut. These two options are available for any window decal but should be used with discretion when complex designs are involved. For complex designs we recommend a simple rectangle or square shaped decal.
Individual letters that can be applied to windows are actually a different product entirely. This product is called cut vinyl or vinyl lettering. This isn’t currently offered on our website but is something we can produce for both personal and commercial use. If this is what you are looking for please contact us to get a custom quote and discuss options.
- How small or big can my window decal be?
- Your decal can not be smaller than 6”x6” nor bigger than 52”x1798”. So as long as you can keep one of your dimensions between 6” and 52” you can create a decal of virtually any size.
- What if my decal has more than 2 colors? Will it cost more?
- We print all of our signs and decals in full color. Thus, a sign or design with more than two colors will not increase the cost of your sign. For reduced pricing you can make your decal smaller or order any quantity of identical decals greater than one for bulk pricing.
Usage
- Will the decal damage or ruin my window?
- The decal will not damage your window in any way. Even if residual adhesive is left after removing the decal this can generally be removed with a cleaner or sharp edge. The only potential for damage is while using a sharp edge for installation or removal. Be careful not to scratch your window when doing either of these things.
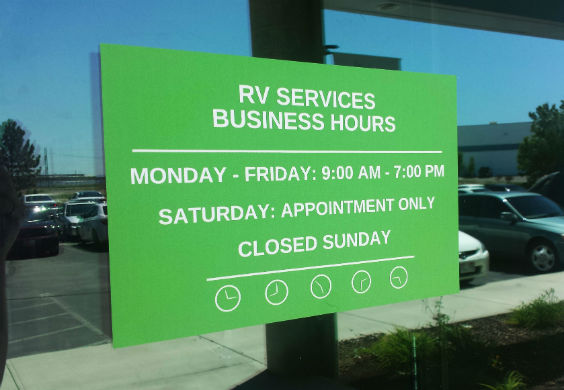
- What are opaque window decals typically used for?
- Custom opaque window decals can be used both for a home or business setting. Home uses include signs declaring no soliciting, no trespassing, “please knock”, security signage, etc. Business uses are far more common and can be used for everything from business hours to sales and promotions to posting store rules such as “employees must wash hands” and even surveillance decals.
- Will the decal impact the transparency of my window/storefront?
- Due to the opacity of this type of window decal it will affect the transparency of your storefront or glass surface upon which it is placed. Even unprinted decals will obscure the light and visibility offered through an uncovered window. Thus, for darker rooms or areas, or even those that must have transparency through the window(s), we recommend a clear or perforated decal. As noted above more can be read about these types of decals on our window decals page. Alternatively, large opaque decals can obscure the visibility into a room in which some privacy is needed or wanted while still effectively using the window for messaging or otherwise.
- Can I place my decal on the inside of my storefront/window and have it be visible to those outside?
- No. This option is called inside glass and is made possible by a reverse print on a clear material. The reason it is not an option with the opaque window decal is the fact that the default material is opaque. Thus, regardless of what side you print on the backside is going to be opaque. For decals that can be placed inside facing out please select a clear or perforated window decal or clear static cling.
- Can the decal be used only on a glass surface?
- The decal will work on many other surfaces. In general these surfaces would include any smooth and non-porous surface such as plastic, tile, smooth metal and more. Avoid textured or porous surfaces such as unfinished concrete, stucco, brick and more.
Installation & Care
- How do I install my opaque window decal?
-
The first step in installing your decal is to ensure that you have properly cleaned and marked the surface where it will be placed. Using a wet rag and water clean the surface of any dirt, grime or existing grease. Allow the window or surface to completely air dry.
Use a dry erase marker or other temporary writing instrument to mark where the decal will be placed on your window. This is important for proper alignment and spacing. Needless to say marking where the decal will be placed is not mandatory but will help with the installation of bigger decals or those that must be installed to exact measurements or aligned with existing signage.
Once these two steps are done you are ready to install your decal. The first step is to peel the decal away from the backing that is protecting the adhesive side of the decal. After removing the backing spray the window with water using any regular water bottle. You should also spray the back side, or adhesive side of the decal. Spray both generously as the water on the window and the decal will give you “wiggle room” while installing the decal. This will ensure that even if there are air bubbles when originally placed that the decal can be repositioned or peeled back before the adhesive properties take hold.
Once the decal and window surface are wet you should lightly press the decal against the window. Use a squeegee to remove excess water and air as you have the decal positioned as you want. Once the decal and window dry the adhesive properties will kick in. After this point your decal will not be repositionable.
- Does installation require more than one person?
- For decals larger than approximately 24”x24” we would recommend having 2 or more people install the decal. Having additional hands makes it much easier to prevent the decal from sticking to itself and for installing it without big air bubbles or pockets remaining. Always remember to use water both on the window and the backside of the decal so that you give yourself wiggle room before it is semi-permanently adhered to the surface.
- How do I store my decal?
- The opaque windows decals are semi-permanent in nature. This means that you will not be able to install them and then remove and store them for future use. While you will be able to remove them without much trouble trying to remove and store them will results in a damaged or very poor looking decal! If you are attempting to store your new decal prior to installation, make sure you store it flat and in moderate temperature.
- How do I clean my decal?
- After installation your decal can be cleaned on a regular basis with a wet rag or cloth that is non-abrasive. This will help keep your decal free of dirt, grime, dust and more. This is especially true if your decal is placed outside.
- How do I remove my decal? Will it leave behind a huge mess and lots of residue?
-
You can remove your decal by simply peeling it away from the window or surface upon which it was applied. Any residual adhesive can be removed with common window cleaner. In some cases a sharp edge may be needed to removed the adhesive that is left behind.
For decals that have been in place for an extended period heat may be needed. Heating up the decal makes it easier to remove. We recommend a simply blow dryer to heat the decal before peeling it away in these situations.
- Can I wash my window with the decal installed?
- Yes. You can wash your windows without fear of damaging the decal. The exceptions to this are power washers and any kind of direct contact with squeegees or sharp edges. Power washers can be strong enough to dislodge the decal from the window on their own. Likewise, using a window cleaning instrument like an industrial squeegee can pull or cause the edges of the decal to come away from the window. This can result in the decal eventually peeling away from the window altogether or simply a ragged or unprofessional appearance.
Your trusted, custom signage provider.


